Caution: The partial block and various malfunctions of the instrument, can occur rarely because of a continuous incorrect Switch-off. Basically if you usually hohttps://www.roverinstruments.com/en/faq/hd-tab-4-7-and-9…s-and-tv-plans-2/ld down the POWER button for more than two seconds (eg 6 or 7 seconds) in some rare cases it may conflict with the “RESET HW” (forced shutdown); while the instrument, (which is in his switch off phase) is still saving the data in memory.
CORRECT switch-off of ROVER instruments:
Press and hold the POWER button, the instrument emits immediately a first BEEP and, at the second BEEP (approximately after 2 seconds) immediately release the POWER button (even if the display is still active and shows the instructions for battery charge).
Caution: Do not hold the red POWER button after the second BEEP, to avoid starting the HW RESET function (forced shutdown). Basically, every time you switch-off, the instrument needs about ten seconds to save the data in memory before switching off, if for every switch-off, accidentally you activate the HW RESET function (forced shutdown) there is the possibility to corrupt the data in memory.
However, if the instrument is partially blocked, you have to do the “FORMAT HARD DISK” and then reload the SW and the memory plans with your PC as per instructions listed below:
| FORMAT HARD DISK | ||||
| PREREQUISITES: Before carrying out the procedure “FORMAT HARD DISK”, make sure you have accomplished all the following points: | ||||
1) Being already registered in the ROVER web site “SW UPDATE “ area;
|
||||
| 2) If you are already registered, run directly the “Login” typing your “Username” and “Password”; | ||||
| 3) Download in the desktop of your PC, the ROVER S.M.A.R.T. interface program; | ||||
| 4) Install the ROVER S.M.A.R.T. interface program in your PC (only the first time);
N.B.: If the ROVER S.M.A.R.T. interface program is already installed in your PC, check that it is the LATEST version and always delete the old one;
|
||||
5) Select the exact model of your instrument and click on the “GO” button;
|
||||
| Now we can accomplish the “FORMAT HARD DISK” PROCEDURE |
||||
| Warning: The following porcedure erases the memory of the instrument. At the end, you will have to reload the instruments software and TV and SAT memory plans. | ||||
| 1) Switch-on the instrument (press once the POWER button to display on the screen the main HOME MENU); | ||||
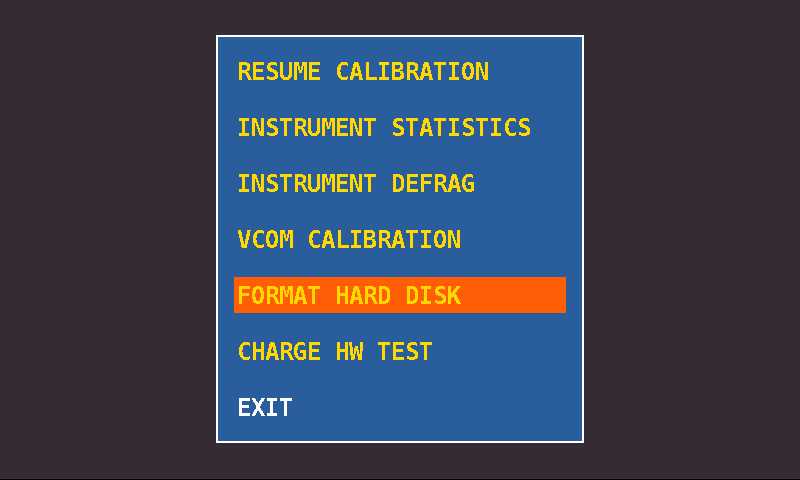
| 2) Press and HOLD for at least 10 seconds SIMULTANEOUSLY the 3 mechanical buttons, SPECT, PLAN and VOLUME and wait until on the instrument appears the menu shown in Figure 1; | ||||
 |
 |
|||
| Figure 1: Menu selection “FORMAT HARD DISK” |
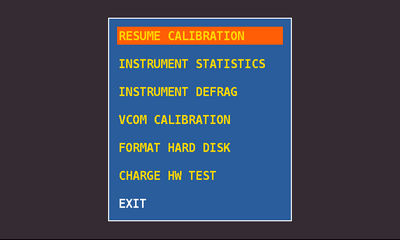
Figure 2: Menu selection “RESUME CALIBRATION” |
|||
| 3) Select “FORMAT HARD DISK” (Figure 1), press the encoder (ENTER) and wait for the execution of the process; | ||||
| 4) Select the “RESUME CALIBRATION” (Figure 2), press the encoder (ENTER) and wait for the execution of the process; | ||||
| 5) When the process is completed switch-off the instrument; | ||||
| 6) Switch-on the instrument and immediately after press and hold the VOLUME button until the completion of the start-up function, on the bottom right point of the screen, you will see a red square; | ||||
7) Load the SW (previously saved on the desktop of your PC);
|
||||
| 8) Switch-off the instrument; | ||||
| 9) Switch-on the instrument and immediately press and hold the VOLUME button until completion signaled by a BEEP, after release the button; | ||||
10) Load the TV and SAT memory plans (previously saved on the desktop of your PC);
|
||||
|
11) When finished, switch-off the instrument and switch-on again after 10 seconds to verify proper operation.
|
||||